
Garageband for Songwriters - Part Two
Welcome to Part Two of our series on Garageband for songwriters. In Part One, we went over how to get set up and start recording. Here, we will discuss basic editing and mixing that can be done in Garageband to make basic tracks sound great. To reiterate, the goal is to get your music heard, not to create your masterpiece. This is just one of the early steps 🙂
Editing
Editing is the process of trimming and aligning all of your recorded regions. Often there is a bit of noise in preparation for actual playing, or just after and you’ll want to eliminate these noises in most instances. To trim your regions, hover the mouse over the edge of the region. You’ll see your cursor turn into a bracket with arrows pointing both directions. You can shorten your region to the desired starting point. Usually, the waves shown on the region are a good indicator of where you want the starting point. If you’ve gone too far into the region, you can always trim in the opposite direction!
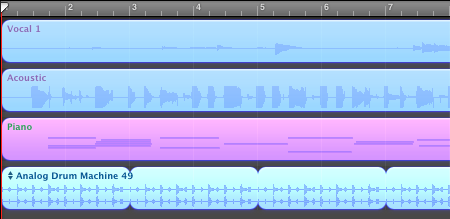
Now at the end of the region, it’s a bit different. Again, hover your mouse at the edge of the region. When the cursor is in the upper right corner of the region, you’ll see a looped arrow. If you click drag the region to the right with that cursor, it will start a “loop”. This means that the region will start again immediately from the beginning. This is useful when you’ve recorded one or two measures that need to be repeated for several bars, and commonly used for drums. If you are singing and playing along with guitar or piano, this probably won’t be of much use. Bring the cursor down to the bottom corner of the region and you will see the familiar trim icon from before.
If you have any overdubs, they might need to be shifted to the left or right in order to match with the rest of the song. Simply click and hold the region, you will be able to slide it left to right. It will also allow you to move the region between different tracks, so be careful!
Once everything is in place and sounding in sync, we can move onto mixing!
Mixing
Mixing is blending all of your tracks together into a singular song, and is an art form in itself. Without mixing, a song would sound incredibly dull, flat, and mushy. Mixing adds depth and distance between all of the tones and frequencies. It allows all of the instruments to be heard as they should, and live together in harmony. Mixing is a nuanced art form and requires years of practice to get great, like most art forms, it is subjective and based upon the taste and genre of the song and sounds recorded.

Personally, I like to start with the most basic “effects”: Volume and panning. Most of us are already familiar with volume (how loud or quite something is). Panning is the distribution of sound between the left and right speakers. I’ve found that waiting to adjust these two things later in the mixing process creates more problems than it solves, and actually eliminates a lot of need for processing effects (things like compression and reverb).
Listen to the song in full. Make sure that none of the tracks have points that are so loud they distort (clipping). Adjust the track volumes as you see fit. There is no right or wrong, but you’ll always want to be sure that all the instruments and sounds compliment each other.

The small slider adjusts the volume, while the dial flanked by the L and R control the panning.
If you are still finding that certain instruments are hard to decipher after the volumes have been adjusted, trying panning different tracks into different speakers. This is especially useful when there is an intricacy to an instrument, say soft fingerpicking. Panning often separates sounds within a similar EQ level all on it’s own. Generally speaking, the main sonic elements of a song (ie voice, guitar, and piano) don’t want to be panned too drastically. A few clicks off center should do the trick. Bass instruments usually sit right in the middle. Again, this is your song and ultimately, these decisions are yours to make. There is no right and wrong.
So now that you’ve got your volume and panning dialed in and things are sounds pretty good, let’s move on to…
PROCESSING
Just like pedals for guitar, you have an arsenal of processing effects that can be applied to each track to give them different sonic characteristics. Beware though of the same pitfalls of guitar pedals. You can spend hours and hours playing with effects, or trying to hone it in just right, but these things can often lead to distractions. We recommend keeping it practical in the beginning. After all, it’s about getting other people to hear your music.
*No amount of effects, no matter how skilled their application is, will fix a poorly recorded track. If you realize that something is out of tune or out of sync, it’s best to re-record. Editing and processing can only improve what is already good.
First, select the track with which you want to start. There are a dozen different opinions out there as to what the order should be when mixing instruments. Some people like to mix the rhythm first, and then the harmony instruments, and then melody. Some start with the vocals. The truth is, as you mix, you’ll constantly be going back to make adjustments to your other tracks. So with that said, let’s start with the acoustic guitar…
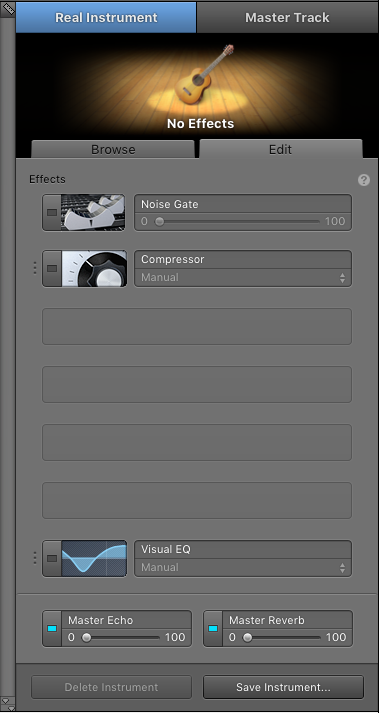
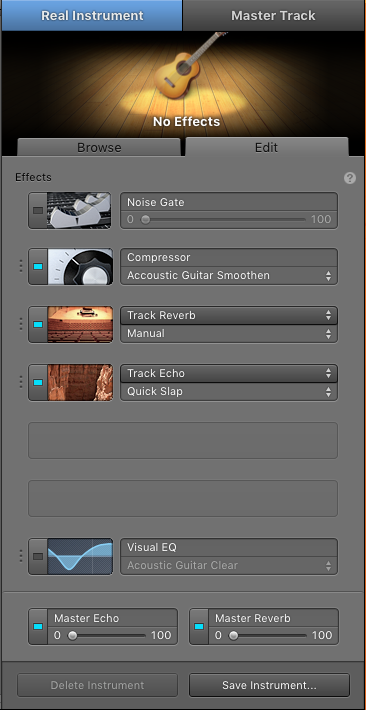
Highlight your acoustic guitar track (all of the same information applies to any other instrument, say piano, ukulele, or or tambourine). On the right side of the window you’ll see your track options. Select the edit tab, which will bring you to your processing effects page. Garageband already has some defaults applied.
There are 17 different effects to choose from. Some are practical, some not so much. When you have a free hour, go through and understand what some of the obscure ones are. Here, we will focus on the more common and useful effects like noise gate, compression, reverb, echo, and EQ.
Noise Gate – helps to reduce background noise by eliminating any frequency below a set volume. Generally, it is good to try to avoid a noise gate, as it can make the track sound choppy. Always try to record in as quiet a space as possible.
Compression – This is a tricky, yet essential, one. Compression kind of keeps everything sounding uniform. It takes your peak volumes and compresses them into a consistent volume throughout the whole track. The flip side is that it also makes your quietest volumes louder. This video does a great job of going into more detail as to what compression is and how to use it. Effective compression makes a song really pop and is often what separates an obvious home recording and a professional sounding one.
Reverb – This allows space in the track. Reverb gives a sense of the instrument being played in a space. Short reverb gives the impression of a small room or space, while long reverb mimics a large space. It is often used to make vocals more dynamic and compelling. Again, be careful. A lot of long reverb can quickly make a song sound muddy and loose clarity.
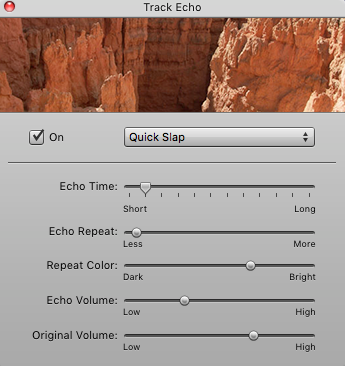
Echo – Similar to reverb, echo adds rhythmic repeats to the sound on the track and gives a sense of space, though does not settle in a mix quite as easily as reverb.
EQ (or equalization) – Adjusting the EQ separates all of the frequencies within one track into multiple grids that can then be adjusted accordingly. If an acoustic guitar is too boomy, one would try lowering (cutting) some of the lower or bass frequencies. If a bass drum is not getting the punch you want, try cutting some of the high or treble frequencies.
* With EQ, best results come from removing frequencies, rather than adding them. If a song sounds too bassy, try cutting some of the bass before adding any treble and vice versa. Adding (boosting) frequencies to an already off track often only make it worse.
Back to the acoustic guitar. If you click on the icon next to the effect name, it will bring you to a control panel. There you can manually make all of your adjustments, though one of the most impressive parts of Garageband is its offerings of presets (pre-picked adjustments for a multitude of instruments). You’ll see right up top, two different presets for acoustic guitar.
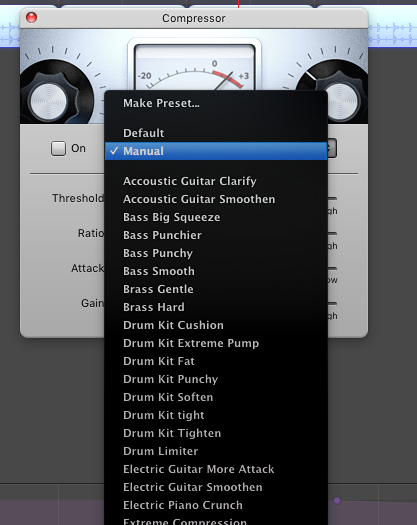
If you are new to mixing, we highly suggest picking a preset and learning how it affects the track. So we’ll go ahead and select Acoustic Guitar Smoothen and click on the small box next to the control panel to engage the effect.

You’ll only here a slight difference, but the art of mixing reveals itself in very small ways.
Next I’ll add reverb. I want to keep a small room/intimate vibe (think Damien Rice?). Again, there is great selection of presets, but none of them are hitting the mark.
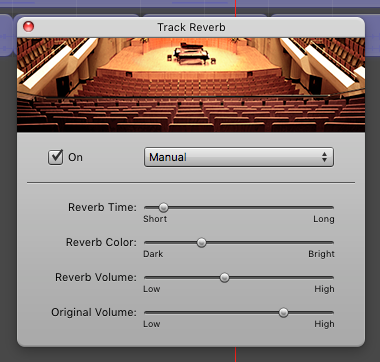
To keep the reverb small, I’ve left the time short and the reverb volume just below middle, and the original signal volume closer to high. The reverb color can be adjusted to your liking.
I wouldn’t normally add echo to an entire acoustic guitar track, but I’ll try giving this song a vintage vibe with a quick “slap-back” echo. This effect was popular with old Elvis and rockabilly songs.
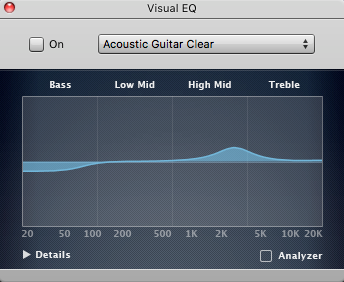
EQ, again like mixing, is an art of its own right. Select different presets to see what parameters are usually set at for different instruments. Small adjustments can have drastic results, so move slowly.
This would also be a great time to mention that you can isolate a track when mixing, or mix along to all of the other tracks. If you want to isolate a track in order to listen to it very closely, click on the small headphone button next to the instrument icon on the track control. This should be used sparingly though. A track might sound exactly as you want it to on it’s own, but that usually doesn’t mean that it sounds just right in the whole mix. Always listen to all of the instruments when mixing, and try to use isolation for nuances only.
The Acoustic Guitar Clear present sounded pretty good, so I went with that, though I did cut the treble a bit.
My new track looks as such… I still have two free spaces to add other effects, but I want to keep this one clean and simple, so no need to add more.
Rinse and repeat for all other tracks. If you really love the sound you’ve come up with and know you’ll be recording more on that instrument, go ahead and hit Save Instrument on the bottom right of that page. You’ll be able to fire up all the same settings on different projects. This is particularly handy when recording an EP or LP. It’s a good rule of thumb to try to have a consistent overall sound, especially to core instruments like bass, drums, guitar, piano, and voice.
MASTER TRACK
I like to think of the master track as the frosting that holds the gingerbread house together. The master applies EQ and effects across all of the tracks within the song. In more professional recordings, the mastering is a completely separate process from the mixing, with only a handful of people in the world skilled enough for the task. For home recording, a master track can really bring cohesion to the song.
To show the master track, go to Track > Show Master Track.
You’ll see a track appear at the bottom of the window.

And a new edit page on the right.
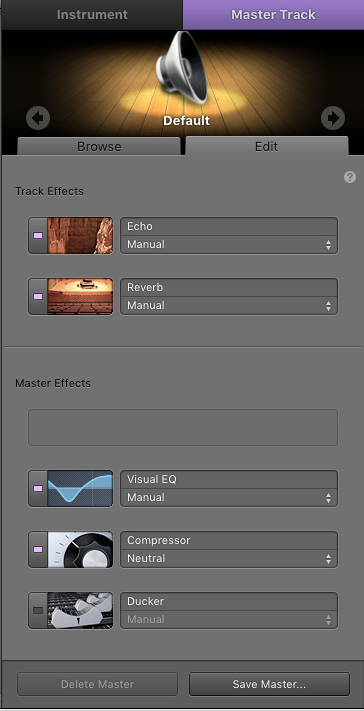
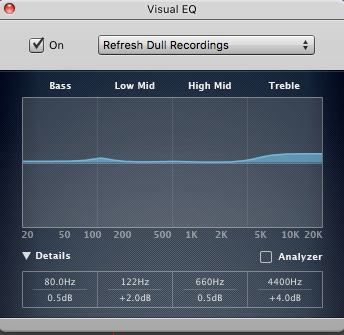
For beginners, we strongly recommend using a preset for the EQ and Compression, and don’t even worry about master effects or the Ducker (primarily a radio/podcast tool).
Many of the EQ presets are meant for specific instruments and not an entire track, with the exception of Refresh Dull Recordings.
If this improves your sound of your song, great! If not, I wouldn’t worry about trying to dial in a master EQ. Again, slight adjustments go a very long way, so it’s easy to send your song out of wack fiddling with different EQ settings.
The Compressor EQ has quite a few presets based on song type, ranging from hip hop to classical. For this example song I’ve chosen Pop Warm. Sounds alright!
I’ll leave it at that and hit Save Master… so that I can apply this same settings to my other songs with a single click.
Export
Now, the final and arguably most important step…sharing your song. Under Share on the menu you can choose to import the song directly into iTunes or your hard drive.
*Always backup your projects on an external hard drive. I’ve personally lost albums worth of material without having a proper safety net in place. It’s devastating.
Try not to get hung up on any one process along the way. Recording and mixing requires practice like any other instrument, so keep at it. Try new techniques, methods, and sounds. But remember, it’s always about the music.